
 EDIT: I scrapped the “Unpaid Testimonials” name a few days after making this and went with “Dirt Reviews”
One of the really cool things about my job working at the races it that I get a lot of folks asking me about different products, riding areas, bikes, and more. I have the unique opportunity that I get a little teaser of a lot of different things, and while I may not always get to experience all of these products first hand, I do get to see how a lot of different products work. I also really like to try out different products, and while I’ve got some great friends in the motorcycle industry that are willing to help me out, there are also certain brands I personally prefer and don’t have any support or contacts at, but still favor those brands regardless.
So, with my desire to get back to posting on this site, I also want to do some simple reviews on different products. There are a TON of video reviews out there for many, many different products but I still really like reading written reviews. I’m sure there’s others out there who share that same desire, so I figured I’d keep some written content out there. But, maybe I’ll make some videos down the road too! Anyway, let’s dive into this!
My Background With The Mako360
Back in 2016, I started seeing a lot of really great local racers from the southeast start posting about XCGear. Actually, the first I can remember seeing it come from was Vance and Evan Earl. If you did more than 1 race in the Carolinas in the late 90s through the early 2010s, then you probably know who Vance Earl is… if by chance you don’t, well, he’s somewhat of a Carolina Legend having won more than his fair share of Mid-East and NCHSA championships. With this kind of success, you know Vance has an eye for great products so XCGear really began to spark my interest.
I saw the Mako360 bar mount and was immediately intrigued. I believe the first one I ever really checked out in person was mounted on Kendall LaFollette’s bike and after seeing how it worked firsthand, I really wanted one. This was late 2016 and I really wasn’t riding much, so I kind of put the idea out of my head. Fast forward to late 2017, and I took over full-time sweep riding duty as the GNCCs. At this point, the idea of the Mako360 was really sparking my interest once again and I was really thinking it would be time to make it happen.
Before this, like any curious dirtbiker, I had already smashed the “Like” button on XCGear’s Instagram and Facebook pages. I started interacting here and there, and eventually started chatting it up with Lance Smith, the mastermind behind XCGear. I met Lance in person a couple of times and knew right away he was a rad guy! It’s always cool to meet people behind some great products who are genuine racing enthusiasts and that’s exactly what Lance is… plus, he’s from Mississippi, which meshes well with my North Carolina background. Lance came up with the product line himself, and spent quite some time making sure the Mako (and their Spurz footpeg line) were just right. He’s a smart guy who really cares about racing and his product, which is awesome.
In 2017 we started using KTM 300XC-Ws for our GNCC sweep bikes. I love the XC-Ws because they work really well for a sweep bike, and still use PDS which I personally like. That comes as a shock to some of those linkage fans but I grew up riding those PDS KTMs, know what I need to do to tweak on it and make it work for me, so I’m happy! KTM started putting counterbalancers in the bikes around the same time, which cut down a lot of vibration but I noticed in stock form that my hands would eventually fall asleep, and after riding hours and hours each day it seemed like my arms and shoulders were the most tired.
I started out the 2018 season on a stock 2018 300XC-W, which I really liked, but I started thinking again about that Mako. Eventually I got in touch with Lance and got a Mako headed my way. Lance actually made it to the Steele Creek GNCC that year, which would be my first event with the Mako, and Lance even offered to take care of the install. So, on Friday before the race I wheeled my bike over to Lance’s camper and he did the install for me! That next day, I realized the Mako was just as big a game changer as I thought it would be. The Mako cut the vibration nearly to zero, and made for a much, much smoother ride.
I rode the rest of the 2018 events with the Mako, then moved the Mako over to a 2019 KTM 300XC-W when it arrived. I used that bike through the 2019 season, and when the season was over, what did I do? Yes, I moved the Mako over to the 2020 KTM 300XC-W I’ll be using this season. This means my Mako has now been on three different motorcycles and the only work it’s ever needed is a change of polymers after somewhere around 150 hours.
So, How Does It Work?
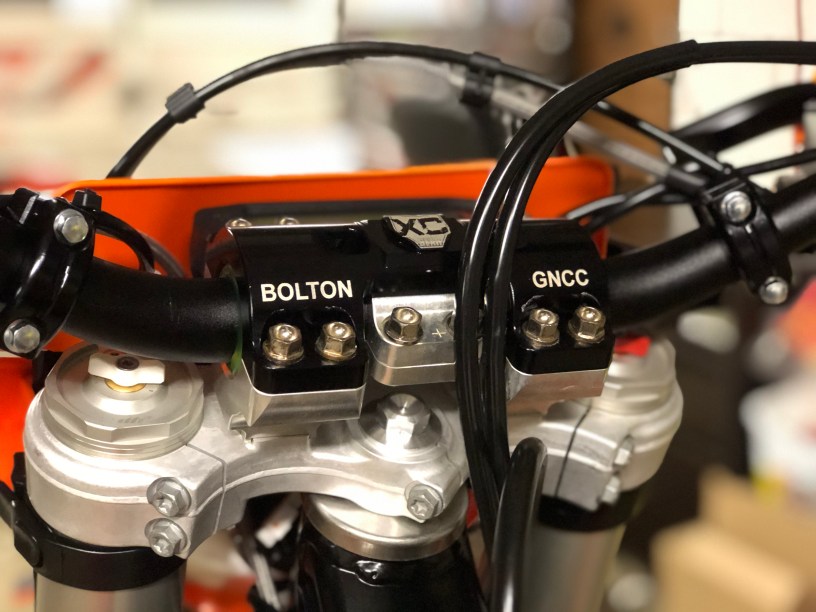
As you’ve read, I’ve been using the Mako for quite some time now and I’ve had quite a few people ask me about it. The biggest questions seem to come from people wondering exactly what the mount does and how it works. This is actually a pretty genius design, and it’s actually fairly simple. The entire XCGear Mako360 consists of 7 pieces and 12 bolts. You’ll remove your stock bar perches from the top of the triple clamp and replace those with the bottom of the Mako360 mount. This is one solid piece that the polymers and your handlebars will rest on, pretty similar to the stock perches.
There are two polymers that go around your bars, and there are several options to choose from. The green polymers are the stiffest, and allow the least amount of flex to your bars. The red polymers are the middle polymers and flex a bit more, while the orange polymers are the softest and allow the most flex. I’ve been using the green ones, which is what I’ve grown to personally prefer. The orange ones are really nice, but flexed just a hair more than I was hoping for but a lot of guys really like that. Once you’ve got the polymers around the bars, you’ll mount the smaller “Shark Bite” polymer in center of the top clamp, along with the center piece of the mount, which mounts to the center of your bars.
This now fits into that bottom mount and the top mount simply sits on top of all of this, and bolts all together. That reads more like instructions to install the mounts, so you’re probably still wondering how it works. Once all of that is mounted together, your handlebars are essentially floating on the mount thanks to the polymers. This means when you hit any sort of bump, whoop or choppy spot, your bars are flexing on the polymers and reducing the hit.
Riding With The Mako360
So, now let’s talk about what its like to ride with the Mako360 on your bike. This is the part where I realized you can sum this up extremely quick because I really only have good things to say about it. I also kind of summed it up in the last sentence of that “How Does It Work” segment. If you skipped that part, I basically said that when you’re riding the bars flex on the polymers. To expand that further, your bars are flexing on these polymers. They soak up the hit your wrists and arms would usually take going over every little bit of chop, bump or whoop.
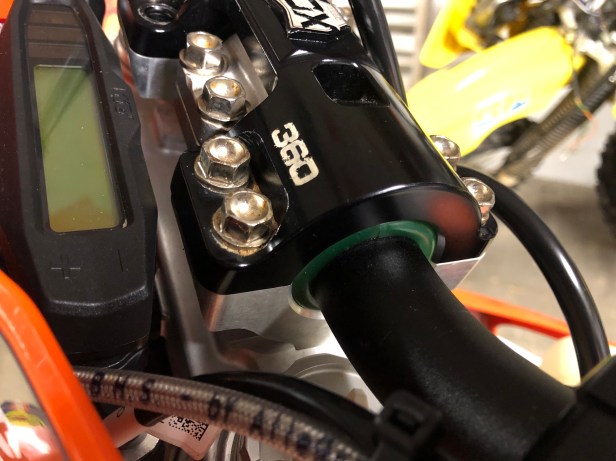
This is pretty similar to Flexxbars, but the Flexxbars really only flex straight down. The Mako allows your bars to flex in all directions. And yes, it will work with whatever set of bars you prefer! The mount itself is definitely larger than a set of stock bar mounts. That visible difference is basically the biggest adjustment. Some folks seem to think the mount is bulky and heavy but thats not the case. The whole thing weighs so little, that it really won’t make any sort of weight difference, especially for an Average Joe. In fact, the biggest benefactor from the Mako will be the Average Joe.
For me, you don’t exactly notice the flexing when you’re riding. I’m not overly picky, so maybe some folks can feel it doing its thing but the biggest difference for me comes when riding over an extended period of time. With the Mako helping to absorb the numerous bumps and chop you’ll experience in an average ride, your level of fatigue is much lower and at the end of the day that sore feeling you get in your wrists, elbows and shoulders is a lot different as well.
Finally, The Summary
Alright, like most things I do I got a little long-winded with this one, so let’s start to wrap this up. XCGear’s Mako360 is a must-have product for someone looking to reduce vibration during their rides. Riders who have experienced wrist or shoulder injuries, or who’s wrists or shoulders just aren’t as good as they used to be are the ones who will notice the biggest difference when riding with the Mako360.
I took it upon myself to write this whole review because I’ve become such a firm believer in the Mako360. It has to be one of the best products I’ve ever put on a motorcycle and I really can’t see myself owning a bike without one. I log hours and hours and hours worth of riding in a weekend riding sweep at a GNCC event, and I can say with total honesty that riding with the Mako360 leaves me feeling way less fatigued and sore at the end of a long weekend.
The other great thing about the Mako is there’s a huge variety of bikes and quads that they fit. I’ve only experienced them on my KTMs, but it’s great that you can buy one Mako360 and it will fit a wide range of models. For example, my Mako360 has fit on my 2018, 2019 and 2020 KTMs but will also fit all KTM Big Bike models in those year ranges, and it would also fit the 2006 KTM 200XC my dad still has! Or, he could throw it on his much newer KTM 350. This is huge as if you’re a brand loyal rider, you can make one Mako360 purchase and continue to use the same mount for a number of years, only switching out the polymers when needed!
Overall, if you’re on the fence about getting a Mako, climb down from that fence and order one right now. You won’t regret it!
Here’s The Star Thing
Durability: 5/5
Ease of Install: 4.5/5
Effectiveness: 5/5
Style: 5/5
Price: 4/5
Overall: 5/5
Price: $399.99-$409.99 (Custom engraving is an additional $20)
Where To Buy: xcgear.com
